
Affiliate Disclosure: This article may contain affiliate links. If you purchase pumpkin carving tools, Halloween decorations, lighting, or other products through links on our website, we may earn a small commission at no additional cost to you. Your support helps us continue creating helpful Halloween resources, seasonal guides, and family-friendly activity ideas.
Pumpkin carving is one of Halloween’s most beloved traditions. A glowing jack-o’-lantern on the porch instantly creates a festive atmosphere, welcomes trick-or-treaters, and gives families a fun way to express their creativity.
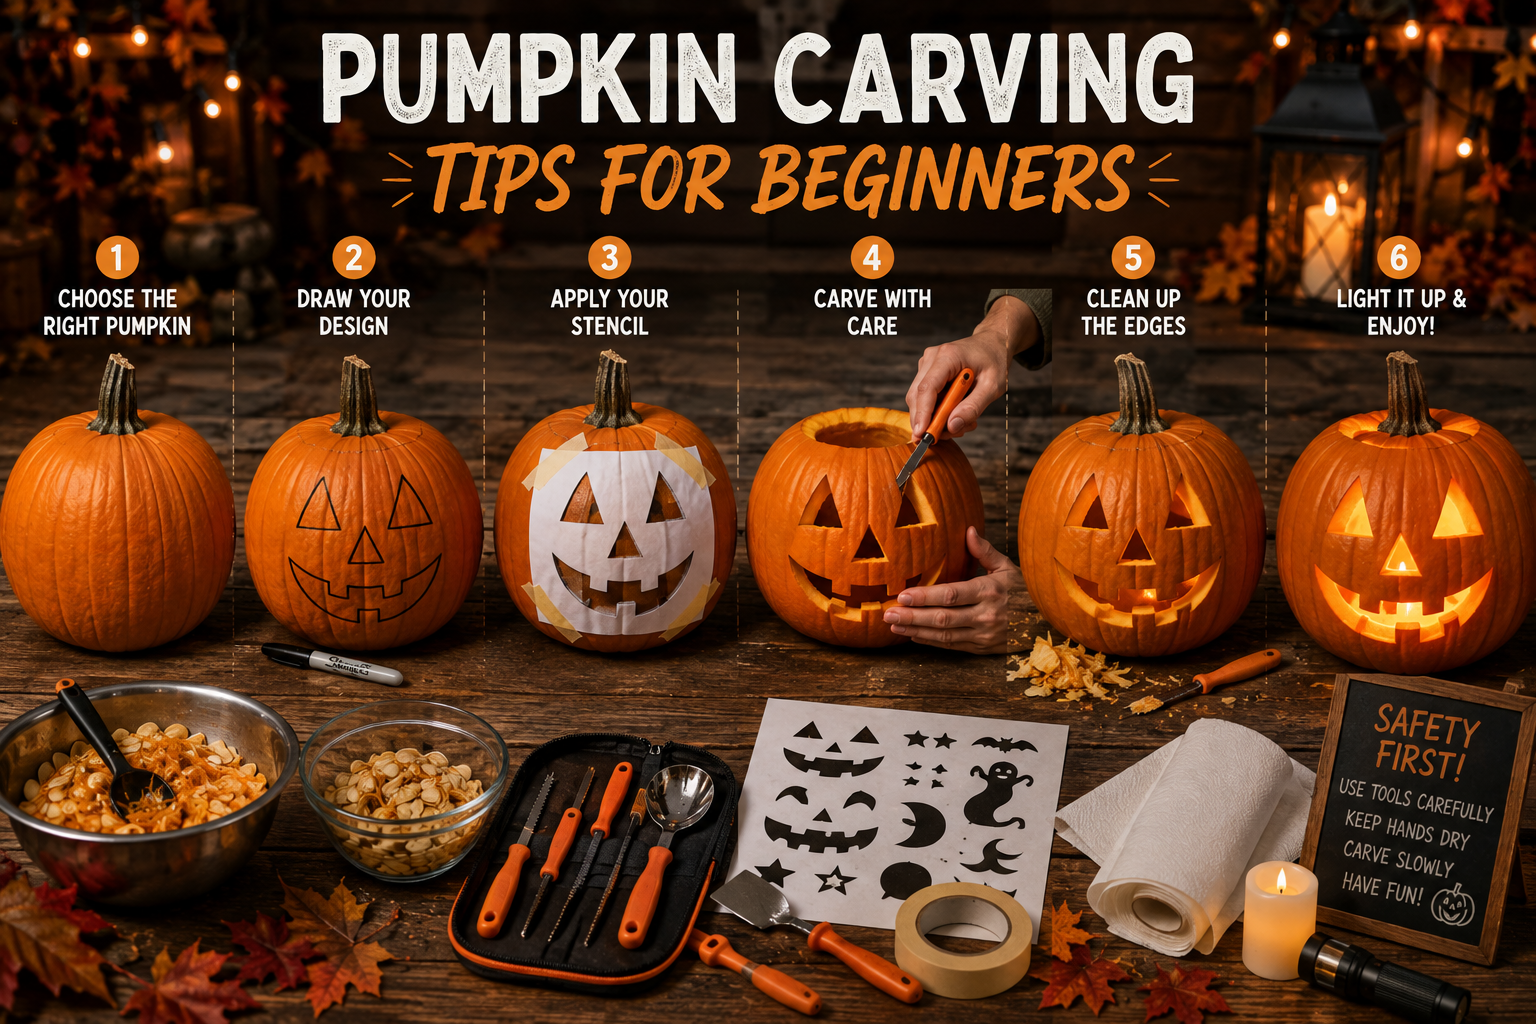
For beginners, however, carving a pumpkin can feel more difficult than expected. Choosing the right pumpkin, removing the seeds, transferring a design, cutting clean lines, and keeping the finished jack-o’-lantern fresh all require a little planning. The good news is that you do not need advanced artistic skills or professional tools to create a pumpkin you will be proud to display.
With a simple design, the right supplies, and a few basic safety precautions, anyone can carve an attractive jack-o’-lantern. This guide covers the essential pumpkin carving tips every beginner should know before getting started.
Choose the Right Pumpkin
A successful carving project begins with a good pumpkin.
Look for one that is:
- Firm
- Fresh
- Free from soft spots
- Free from deep cuts
- Stable when placed on a flat surface
- Large enough for your design
- Easy to carry
Gently press the surface with your fingers. The pumpkin should feel solid rather than soft or spongy.
A strong, dry stem is often a sign that the pumpkin is still in good condition. Avoid lifting the pumpkin by the stem because it may snap off.
Match the Pumpkin to Your Design
Different pumpkin shapes work better for different designs.
Consider:
- Tall pumpkins for long faces or vertical patterns
- Round pumpkins for classic jack-o’-lantern expressions
- Wide pumpkins for landscapes or multiple characters
- Small pumpkins for simple faces
- Smooth pumpkins for detailed stencils
Beginners usually have the easiest time working with a medium or large pumpkin that has a fairly smooth carving surface.
Gather Your Supplies First
Preparing everything before you begin makes the process easier and less messy.
Useful supplies include:
- Pumpkin
- Pumpkin carving kit
- Large spoon or scoop
- Washable marker
- Printed stencil
- Tape
- Newspaper or plastic table covering
- Large bowl
- Paper towels
- Battery-operated candle
- Small flashlight
Pumpkin carving kits often include small serrated tools that are easier to control than large kitchen knives.
Protect Your Work Area
Pumpkin carving can become messy quickly.
Cover the table or floor with:
- Newspaper
- Plastic tablecloth
- Old towels
- Large trash bags
- Craft paper
Keep a bowl nearby for seeds and pulp.
A second container for scraps helps make cleanup faster.
Wash and Dry the Pumpkin
Before carving, wipe the pumpkin with a damp cloth.
This removes:
- Dirt
- Dust
- Outdoor debris
- Surface residue
Dry it completely before drawing or attaching a stencil.
A clean, dry surface makes it easier for tape and markers to stay in place.
Decide Whether to Cut From the Top or Bottom
Most people remove the top around the stem, but cutting an opening from the bottom also has advantages.
Cutting From the Top
This traditional method makes it easy to:
- Remove seeds
- Replace the lid
- Carry the pumpkin before carving
Angle the cutting tool inward slightly so the lid does not fall inside.
Cutting From the Bottom
This method allows you to:
- Place the pumpkin directly over a light
- Avoid visible cuts near the stem
- Create a stable base
- Make lighting easier
Either method works well, so choose the option that feels most comfortable.
Make the Opening Large Enough
A very small opening makes removing pulp frustrating.
Create an opening wide enough for your hand and scoop to fit comfortably.
If cutting from the top, add a small notch to one side of the lid. This makes it easier to line the lid up correctly later.
Scoop Out the Seeds and Pulp
Use a sturdy spoon or pumpkin scoop to remove:
- Seeds
- Stringy pulp
- Loose interior material
Scrape the walls until the inside feels relatively smooth.
You do not need to remove every strand, but clearing excess pulp helps the pumpkin look cleaner and makes lighting more effective.
Thin the Carving Wall
The wall behind your design should not be excessively thick.
Scrape the inside of the pumpkin in the carving area until the wall is approximately one inch thick.
A thinner wall is:
- Easier to cut
- Better for detailed designs
- More likely to allow light through
- Easier for beginners to control
Do not thin the wall so much that it becomes weak or collapses.
Save the Pumpkin Seeds
Pumpkin seeds can be washed, seasoned, and roasted.
Possible seasonings include:
- Salt
- Cinnamon sugar
- Garlic
- Paprika
- Ranch seasoning
- Pumpkin spice
Separate the seeds from the pulp, rinse them, and allow them to dry before roasting according to a trusted recipe.
Start With a Simple Design
Beginners should avoid designs with numerous tiny details.
Good first designs include:
- Smiling faces
- Triangle eyes
- Crescent moons
- Stars
- Ghosts
- Bats
- Cats
- Simple letters
Large shapes and wide lines are easier to cut and less likely to break.
Draw the Design First
Use a washable marker to sketch directly on the pumpkin.
Draw lightly so you can make adjustments.
If you make a mistake, wipe the marker away with a damp cloth and try again.
Avoid permanent markers unless you are confident in the design, as leftover marks may remain visible.
Use a Pumpkin Carving Stencil
Stencils help beginners create more polished designs.
To use one:
- Print the pattern.
- Tape it securely to the pumpkin.
- Make small holes along the design lines using a poker tool.
- Remove the stencil.
- Connect the dotted outline while carving.
Cutting small slits around the paper edges may help it fit more smoothly against a curved pumpkin.
Work From the Center Outward
When carving several shapes, begin near the center of the design.
Then move outward toward the edges.
This helps keep the pumpkin structurally stable and reduces the chance of accidentally pressing against an already carved section.
Cut Small Sections First
Do not try to force out large complicated shapes all at once.
Instead:
- Cut one line at a time.
- Work slowly around corners.
- Divide large shapes into smaller sections.
- Gently push pieces inward or outward after cutting.
Small controlled movements produce cleaner results.
Use a Gentle Sawing Motion
Pumpkin carving tools work best with a slow back-and-forth motion.
Avoid:
- Pushing too hard
- Twisting the tool
- Making fast cuts
- Forcing tight corners
Let the serrated edge do the work.
Patience is more important than strength.
Keep the Tool Perpendicular
Try to hold the carving tool straight instead of cutting at a severe angle.
Straight cuts create cleaner openings and help removable pieces come out more easily.
The exception is the lid, which should be cut at an inward angle so it stays in place.
Turn the Pumpkin Instead of Your Wrist
When cutting curves, rotate the pumpkin whenever possible.
This is often easier and safer than bending your wrist into an uncomfortable position.
Reposition the pumpkin as needed so each cut feels controlled.
Remove Pieces Carefully
After completing the outline, gently push the cut section from inside the pumpkin.
If it does not move easily, check for uncut areas.
Do not force it because the surrounding pumpkin may crack.
Use the carving tool to carefully complete any missed lines.
Clean Up Rough Edges
Small pieces of pumpkin may remain around cut edges.
Use a carving tool or spoon to carefully trim them away.
Smoothing the edges improves the finished appearance and helps light shine through evenly.
Add Depth Without Cutting All the Way Through
Not every part of the design must be completely removed.
You can scrape away only the outer skin to create lighter glowing areas.
This technique works well for:
- Teeth
- Eyes
- Shadows
- Letters
- Facial details
- Background patterns
Scraping creates a softer glow than a fully cut opening.
Test the Pumpkin as You Work
Place a small flashlight or battery-operated candle inside the pumpkin before you finish.
Turn off the room lights and inspect the design.
Look for:
- Areas needing more thinning
- Uneven cuts
- Details that do not show clearly
- Interior pulp blocking the light
Testing early gives you time to make corrections.
Use Battery-Operated Lighting
Battery-operated candles are generally safer and easier than real candles.
Benefits include:
- No open flame
- Less heat
- Longer pumpkin life
- Easy placement
- Reduced fire risk
You can also use:
- LED tea lights
- Color-changing lights
- Small puck lights
- Battery-powered string lights
Choose lights designed for the space where you will use them.
Avoid Open Flames When Possible
Real candles can create heat and fire hazards.
They may also:
- Dry out the pumpkin
- Burn the lid
- Damage decorations
- Become dangerous near costumes
- Blow out in the wind
If you do use a real candle, place the pumpkin on a stable, nonflammable surface away from children, pets, fabric, dried leaves, and decorations. Never leave it unattended.
Make Ventilation Holes if Using Heat-Producing Lights
If a traditional candle or another warm light source is used, the pumpkin needs ventilation.
Create a small opening near the top to allow heat to escape.
Battery-operated LED lights usually produce far less heat and remain the safer choice.
Keep Children Safe
Young children can participate without using sharp tools.
They can help by:
- Choosing the pumpkin
- Drawing the design
- Removing seeds with a spoon
- Sorting seeds
- Adding stickers
- Decorating with paint
- Placing the battery light inside
Adults should handle all cutting.
Older children should use age-appropriate pumpkin carving tools with close adult supervision.
Keep Hands and Tools Dry
Wet hands and slippery tools are harder to control.
Pause occasionally to:
- Wipe your hands
- Dry tool handles
- Clean the pumpkin surface
- Remove pulp from the work area
Good grip and visibility improve safety.
Never Cut Toward Your Body
Always direct the carving tool away from your hands and body.
Keep your supporting hand away from the cutting line.
Do not place your hand inside the pumpkin directly behind the area being carved.
Work Slowly
Rushing is one of the most common causes of carving mistakes and injuries.
Take breaks if your hand becomes tired.
Pumpkin carving should be enjoyable, not stressful.
A simple design carved carefully usually looks better than a complicated design completed too quickly.
Fix Small Mistakes
Minor errors do not have to ruin the pumpkin.
Possible fixes include:
- Reattaching a broken piece with toothpicks
- Expanding a shape to hide an uneven cut
- Adding a new detail
- Turning a mistake into a scar or tooth
- Using decorations to cover an area
Halloween designs do not need to be perfectly symmetrical.
Use Toothpicks for Repairs
If part of the design breaks, toothpicks may help hold it in place.
Insert them carefully into the broken section and surrounding pumpkin.
Keep toothpicks away from exposed walking areas and make sure they are not accessible to young children or pets.
Create Facial Expressions With Shape
Small changes can dramatically affect the pumpkin’s personality.
For a friendly face:
- Use rounded eyes.
- Add a wide smile.
- Keep the teeth simple.
For a spooky face:
- Angle the eyes downward.
- Add pointed teeth.
- Use asymmetrical shapes.
- Create narrow openings.
Experiment on paper before drawing on the pumpkin.
Add Accessories
Accessories can make a simple carving look more creative.
Try adding:
- Witch hat
- Fake glasses
- Yarn hair
- Fabric cape
- Pirate patch
- Decorative ears
- Small signs
- Faux leaves
Keep accessories away from open flames.
Combine Carving and Painting
You do not have to choose between painting and carving.
Try:
- Painting the pumpkin black and carving stars
- Adding white painted details around a carved ghost
- Painting facial features and carving only the mouth
- Using metallic paint around carved patterns
This approach allows beginners to create more detailed designs with less cutting.
Use Multiple Pumpkins
A group of simple pumpkins can create more impact than one difficult design.
Create:
- Pumpkin family
- Set of ghosts
- Different facial expressions
- Letters spelling “BOO”
- A row of moons and stars
- Favorite story characters
Coordinated pumpkins make an impressive porch display.
Help the Pumpkin Last Longer
Carved pumpkins naturally begin to dry out and soften.
To slow the process:
- Choose a fresh pumpkin.
- Keep it out of direct sunlight.
- Store it in a cool location.
- Bring it inside during unusually warm weather.
- Avoid excess heat from candles.
- Keep it protected from heavy rain.
- Remove standing water.
Inspect it daily for signs of decay.
Refrigerate When Practical
If space allows, place the carved pumpkin in a refrigerator overnight.
This may help it stay fresh longer.
Keep it away from uncovered food and place it on a tray or inside a large bag to contain moisture.
Rehydrate a Wilted Pumpkin
A slightly shriveled pumpkin may improve after soaking in cold water.
Place it in a clean sink or large container for a short period, then dry it thoroughly.
This method may temporarily restore firmness, but a pumpkin showing mold or advanced decay should be discarded.
Watch for Mold and Rot
Discard the pumpkin if you notice:
- Significant mold
- Strong unpleasant odor
- Collapsing walls
- Large soft areas
- Leaking liquid
- Insect activity
Keep decaying pumpkins away from children and pets.
Dispose of Pumpkins Responsibly
After Halloween, consider:
- Composting
- Using municipal yard-waste collection
- Participating in a pumpkin recycling program
- Removing candles and decorations before disposal
Do not leave painted, glittered, or chemically treated pumpkins where wildlife may eat them.
Check local guidance before placing pumpkins outdoors for animals.
Common Beginner Pumpkin Carving Mistakes
Avoid these common problems:
- Choosing a soft pumpkin
- Starting with a design that is too detailed
- Making the opening too small
- Leaving the carving wall too thick
- Using large kitchen knives
- Cutting too quickly
- Forcing pieces out
- Forgetting to test the lighting
- Using an unattended candle
- Displaying the pumpkin in direct heat
- Carving too far in advance
Careful preparation prevents most problems.
Beginner Pumpkin Carving Checklist
Before starting, make sure you have:
- Fresh pumpkin
- Table covering
- Carving kit
- Scoop or spoon
- Washable marker
- Stencil
- Tape
- Bowls for seeds and scraps
- Paper towels
- Battery-operated light
- Adult supervision for children
A simple checklist makes the activity smoother and more enjoyable.
Frequently Asked Questions
What is the easiest pumpkin design for beginners?
A classic face with triangle eyes, a small nose, and a wide mouth is usually the easiest. Large shapes and simple lines reduce the risk of breakage and are easier to cut.
Are pumpkin carving kits safer than kitchen knives?
Pumpkin carving kits are often easier to control because they use smaller serrated tools designed specifically for pumpkin shells. However, they can still cause injuries and should be used carefully with adult supervision.
How thick should the pumpkin wall be?
The wall behind the carving area should usually be about one inch thick. If it is much thicker, cutting becomes more difficult and light may not shine through clearly.
How long does a carved pumpkin last?
A carved pumpkin often lasts several days to a week, depending on temperature, humidity, freshness, and care. Warm weather and direct sunlight may cause it to deteriorate more quickly.
What is the safest way to light a jack-o’-lantern?
Battery-operated LED candles or puck lights are generally the safest options because they do not use open flames and produce very little heat.
Final Thoughts
Pumpkin carving may look intimidating at first, but beginners can create impressive jack-o’-lanterns by keeping the process simple. Start with a fresh pumpkin, choose a design with large shapes, use tools made for carving, and work slowly.
The goal is not to create a perfect work of art. It is to enjoy a classic Halloween activity, spend time with family or friends, and create something that adds personality to your seasonal decorations.
Remember to let adults handle sharp tools, use battery-operated lighting whenever possible, and inspect the pumpkin regularly once it is displayed. Small mistakes can often become part of the design, so do not be afraid to improvise.
With a little patience and creativity, your first carved pumpkin can become a glowing Halloween centerpiece—and the beginning of a tradition you will look forward to every October.